In this tutorial, I explain a simple way of setting up a virtual server on AWS to use it as an SSH proxy for accessing a server that does not have a public IP address. The general idea should also work with virtual servers running on data centers of other cloud providers.
This post was updated on 2023-07-06 to adjust SSH options ServerAliveInterval, ClientAliveInterval, and the related systemd parameter. Updates are summarised in the Post Updates section.
1 Introduction
Problem
Consider the layout shown on the diagram below where on our home local area network (LAN), we have a computer that we access over SSH, e.g. with ssh myadmin@192.168.0.5 or ssh my-home-server. And we want to have a way of connecting to it from our laptop or other portable device not only from the home LAN but also when we leave the home network, e.g. from school or office. However, because home routers are often configured to apply network address translation (NAT), the home server (@my-home-server) would not have its own IP address on the public network. Therefore it is not accessible from outside of our LAN network.
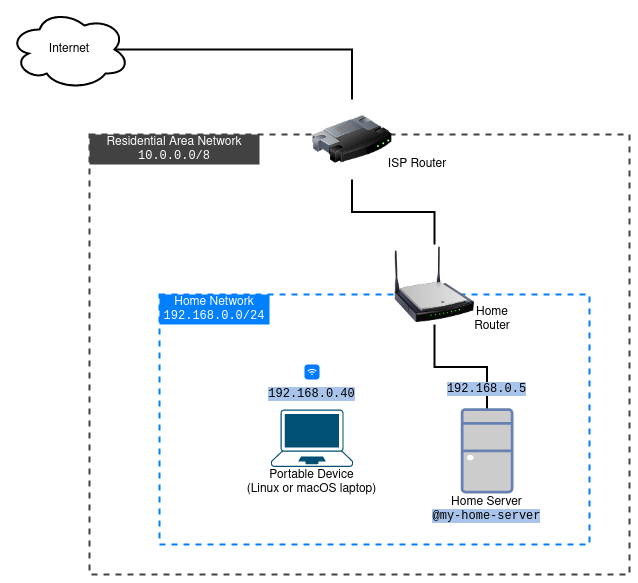
If our home router has a public IP address on its internet-facing interface, usually called the WAN interface, the solution is relatively simple: configure port forwarding on the router, enable some kind of dynamic DNS service, and use the dynamic DNS hostname to access the server. However, sometimes the router’s WAN port is connected to another LAN, e.g. one managed by the housing complex or the internet service provider. In this situation, the network on the WAN side of the home router is sitting behind another NAT, and we cannot enable port forwarding on the upstream router because we do not have access to its configuration.
There are different ways one can set up SSH access to the home server from the internet. This tutorial explains a method that uses a virtual machine running on an Amazon Web Services (AWS) data center as a gateway for accessing our home server. Familiarity with SSH and systemd unit files would be useful when following this tutorial.
Assumptions
The home server and the home router do not have public IP addresses, or we cannot enable port forwarding on the router.
In this tutorial, we do not consider communication using IPv6 addresses.
If the firewall software is enabled on the home server, one must make sure it is configured to allow SSH communication. The tutorial does not cover the firewall setup.
Prerequisites
A home server running Linux with the
systemdinit system (Ubuntu, Fedora, Rocky, etc.). This tutorial shows the setup on a machine running Debian. If the server uses a different init system, the relevant part of the tutorial must be adjusted.A working SSH connectivity when the laptop is connected to the home network (
ssh myadmin@192.168.0.5).For simplicity, in the remainder of the tutorial, I will use the term “laptop” to refer to the portable device that will be used to connect to the home server from outside. The instructions should work on devices running Linux and macOS.
User with administrative access on the home server - user with the
sudoprivileges.An Amazon Web Services (AWS) account for launching a virtual server in the cloud. If you want to use another cloud service provider, then you can follow their instructions on launching a virtual server.
New to AWS?
If you want to follow the tutorial but do not have an AWS account, you can sign up for a new account at https://portal.aws.amazon.com/billing/signup. AWS has a Free Tier program that covers running a small virtual server for free within the first year of the creation of a new account. Unless you plan to use additional AWS resources, the Free Tier program can fully cover this setup.
Although for years the AWS Free Tier program included these services for free for new accounts and I think it will not change in the near future, to avoid unexpected expenses, please make sure to check what is covered at the time you sign up. As of writing this tutorial (June 2023), the services that we utilize are covered up to the following limits:
- 750 hours/month of t2.micro EC2 instance;
- 30 GB of general-purpose SSD storage (we need only 8 GiB);
- 100 GB of data transfer each month.
2 Solution
The setup that we will create is represented below.
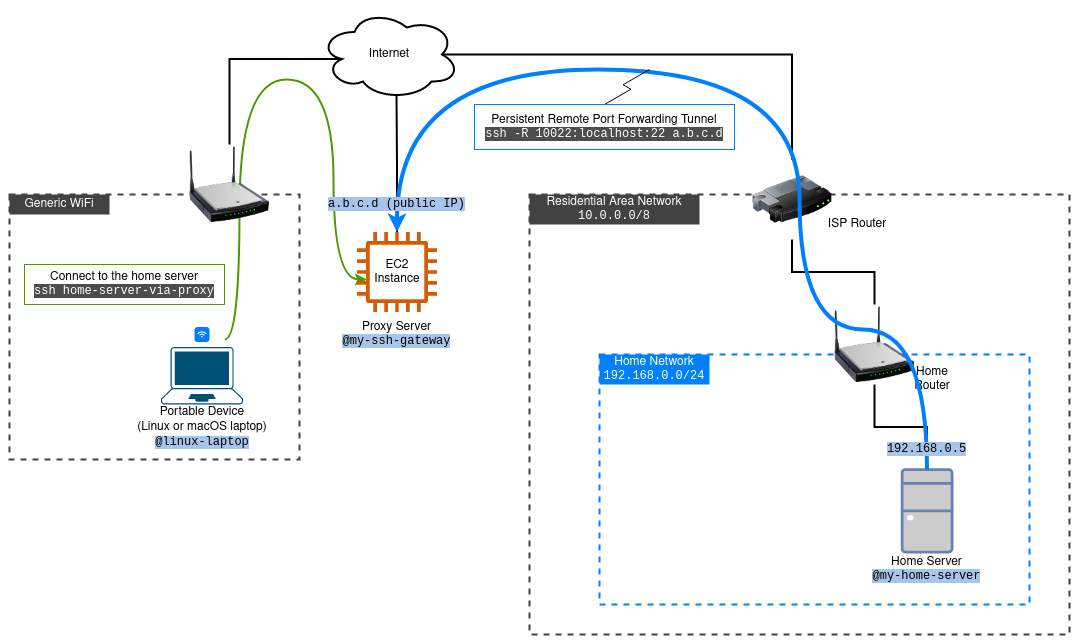
In this example, 192.168.0.5 is the IP address of my-home-server on the home network, and a.b.c.d is the public IP address of the SSH gateway server that will be assigned to it by AWS when the instance is launched.
In the tutorial we use the following conventions:
- Laptop user and hostname:
moss,@linux-laptop - Home server admin user and hostname:
myadmin,@my-home-server - AWS EC2 instance user:
ec2-user - AWS EC2 instance host aliases used in SSH configs:
my-ssh-gateway
A quick refresher on SSH port forwarding options relevant to this tutorial can be found in Appendix A: “SSH Port Forwarding Basics.”
Prepare SSH Keys
On the home server, we need to have an SSH key that will be used to establish the tunnel between the home server and the my-ssh-gateway server.
Log in to my-home-server and run the following to generate the user’s key pair:
1
ssh-keygen -t ed25519
Please accept all the default values and do not set the passphrase. The new private key will be placed at $HOME/.ssh/id_ed25519 and its public key at $HOME/.ssh/id_ed25519.pub. We can copy the public key (the contents of the id_ed25519.pub file) to the laptop. Later we will copy it to my-ssh-gateway.
The laptop user also needs an SSH key. If you do not have one yet, you can generate it by running the same command on the laptop’s terminal. If you wish, you can set a passphrase for this key.
Launch the SSH Gateway Server Instance
With the AWS Elastic Compute Cloud (AWS EC2) service, we can easily launch a virtual server on AWS. These virtual servers are called EC2 instances and we will use one as our SSH gateway server, my-ssh-gateway. Let’s create it using the AWS web console.
Log in to the AWS web console.
In the console search bar, type “EC2,” then click on the EC2 entry. This will open the AWS EC2 service console.
On the top panel, there is a drop-down list of regions. The region names correspond to the physical locations of AWS data centers. Choose the region where you want to run the SSH gateway server. Typically, the region geographically closest to your home server would have better network latency. For example, if you live to the west of the Rockies, you can choose either
us-west-1(N. California) orus-west-2(Oregon).Unless you have already uploaded your public key to AWS in this region, you should do that before launching the instance (there is another option of requesting AWS to generate a key, but I prefer using my own keys).
On the left sidebar, click “Key Pairs” (under Network & Security). This will open the page for managing AWS key pairs.
Click on “Actions” –> “Import key pair.” Here, you can either upload the public key file or just paste the contents of
$HOME/.ssh/id_ed25519.pubfrom your laptop.![Uploading a public SSH key]() Uploading a public SSH key
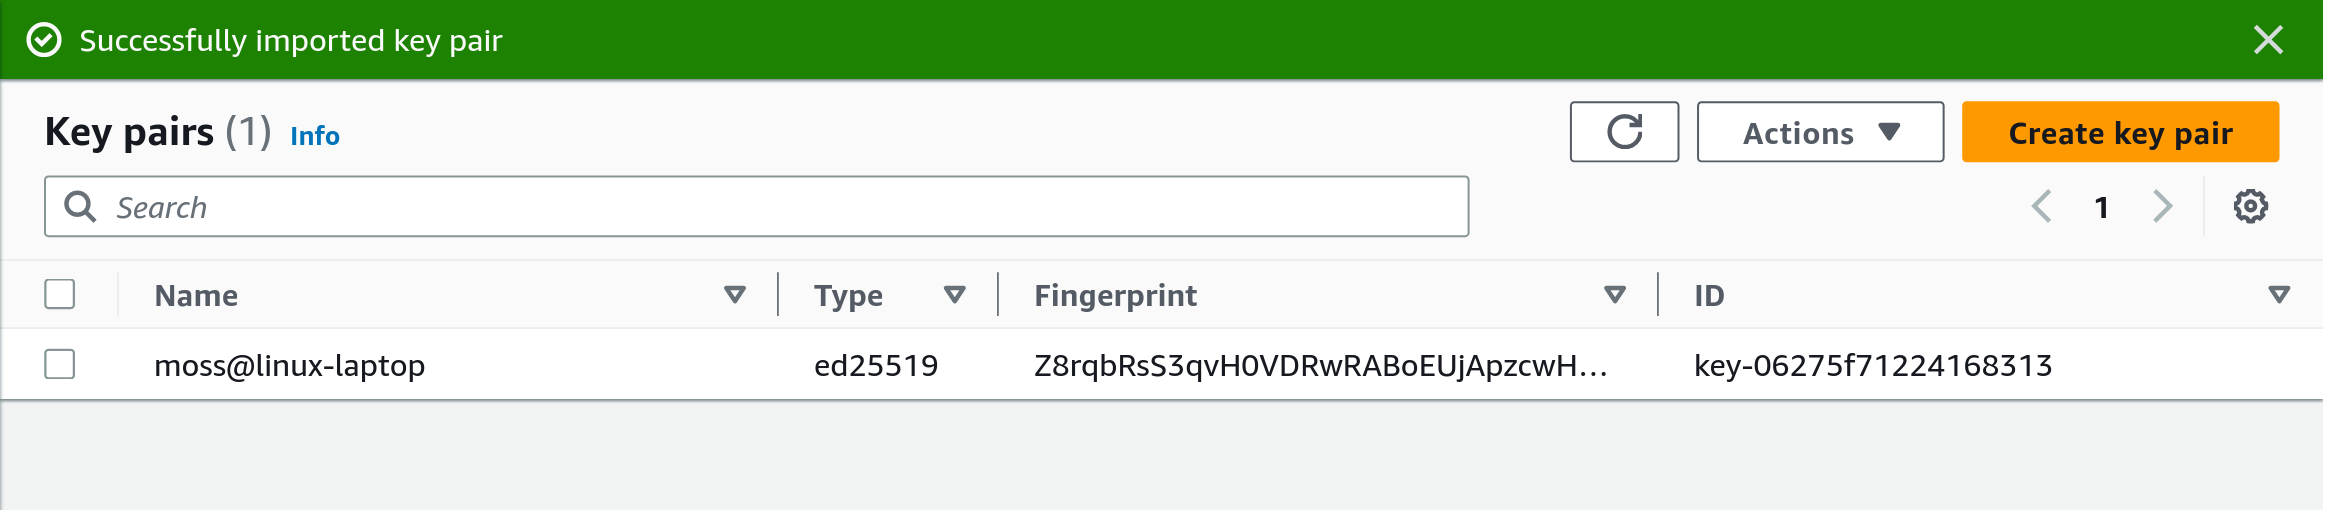
Uploading a public SSH keyPress “Import key pair.” If all went well, your key should have appeared in the “Key pairs” list.
![The moss@linux-laptop public key in the AWS web console]()

At this point, we should be ready to launch our EC2 instance.
On the left sidebar, navigate to “Instances” and click “Launch instances.” You will be presented with the “Launch an instance” page.
Set the name of the instance, for example, “My SSH Gateway.”
We should not need to modify the OS image, instance type, and storage sections because the EC2 web console sets them to Free Tier eligible versions by default.
Scroll down to the “Key pair (login)” section. In the drop-down list, select the key that you uploaded previously.
In the “Network settings” section, make sure the “Create security group” is selected and the checkbox for “Allow SSH traffic from” is ticked, and it should say “Anywhere 0.0.0.0/0” to allow connections from any IP address.
After these settings have been applied the “Summary” panel on this page should look similar to this:
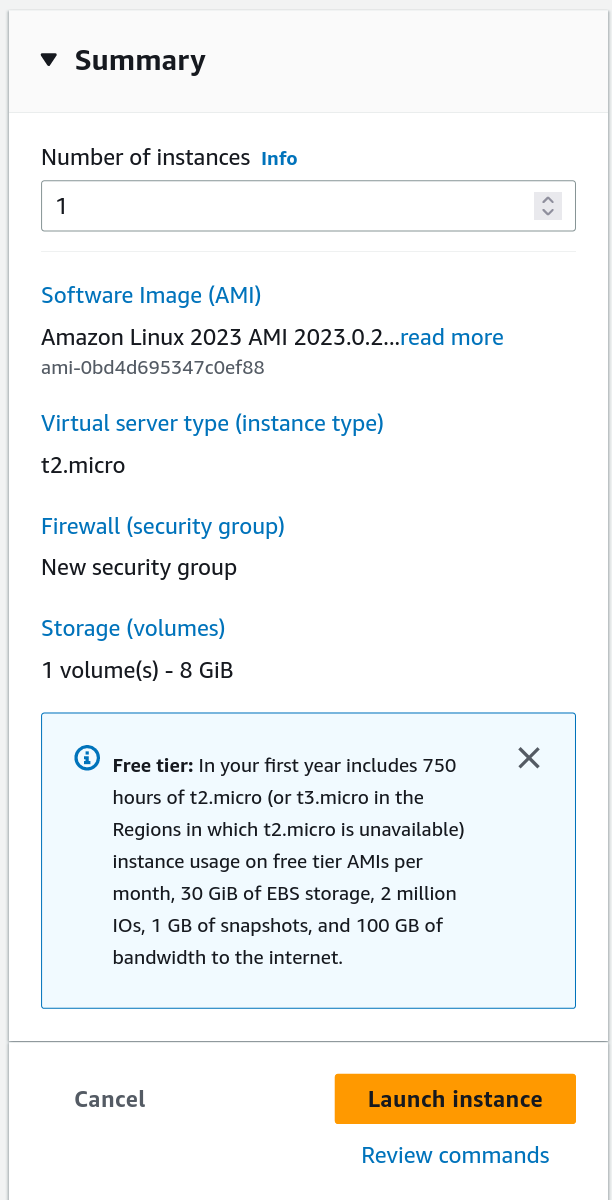
If everything looks good, press “Launch instance.”
SSH into the Gateway Instance From a Laptop
We need to check that we can connect to my-ssh-gateway, the gateway instance we just launched.
When AWS launched my-ssh-gateway, it copied the public key we specified in the launch configuration into the ~/.ssh/authorized_keys file of user ec2-user. Next, we need to know the public IP address of the gateway instance.
On the AWS EC2 web console, use the left sidebar to navigate to “Instances.” This time, the list would show the new EC2 instance, and it should be in the “running” state. If we click on the list entry, instance details with its ID, public and private IP addresses, and other information will be displayed.
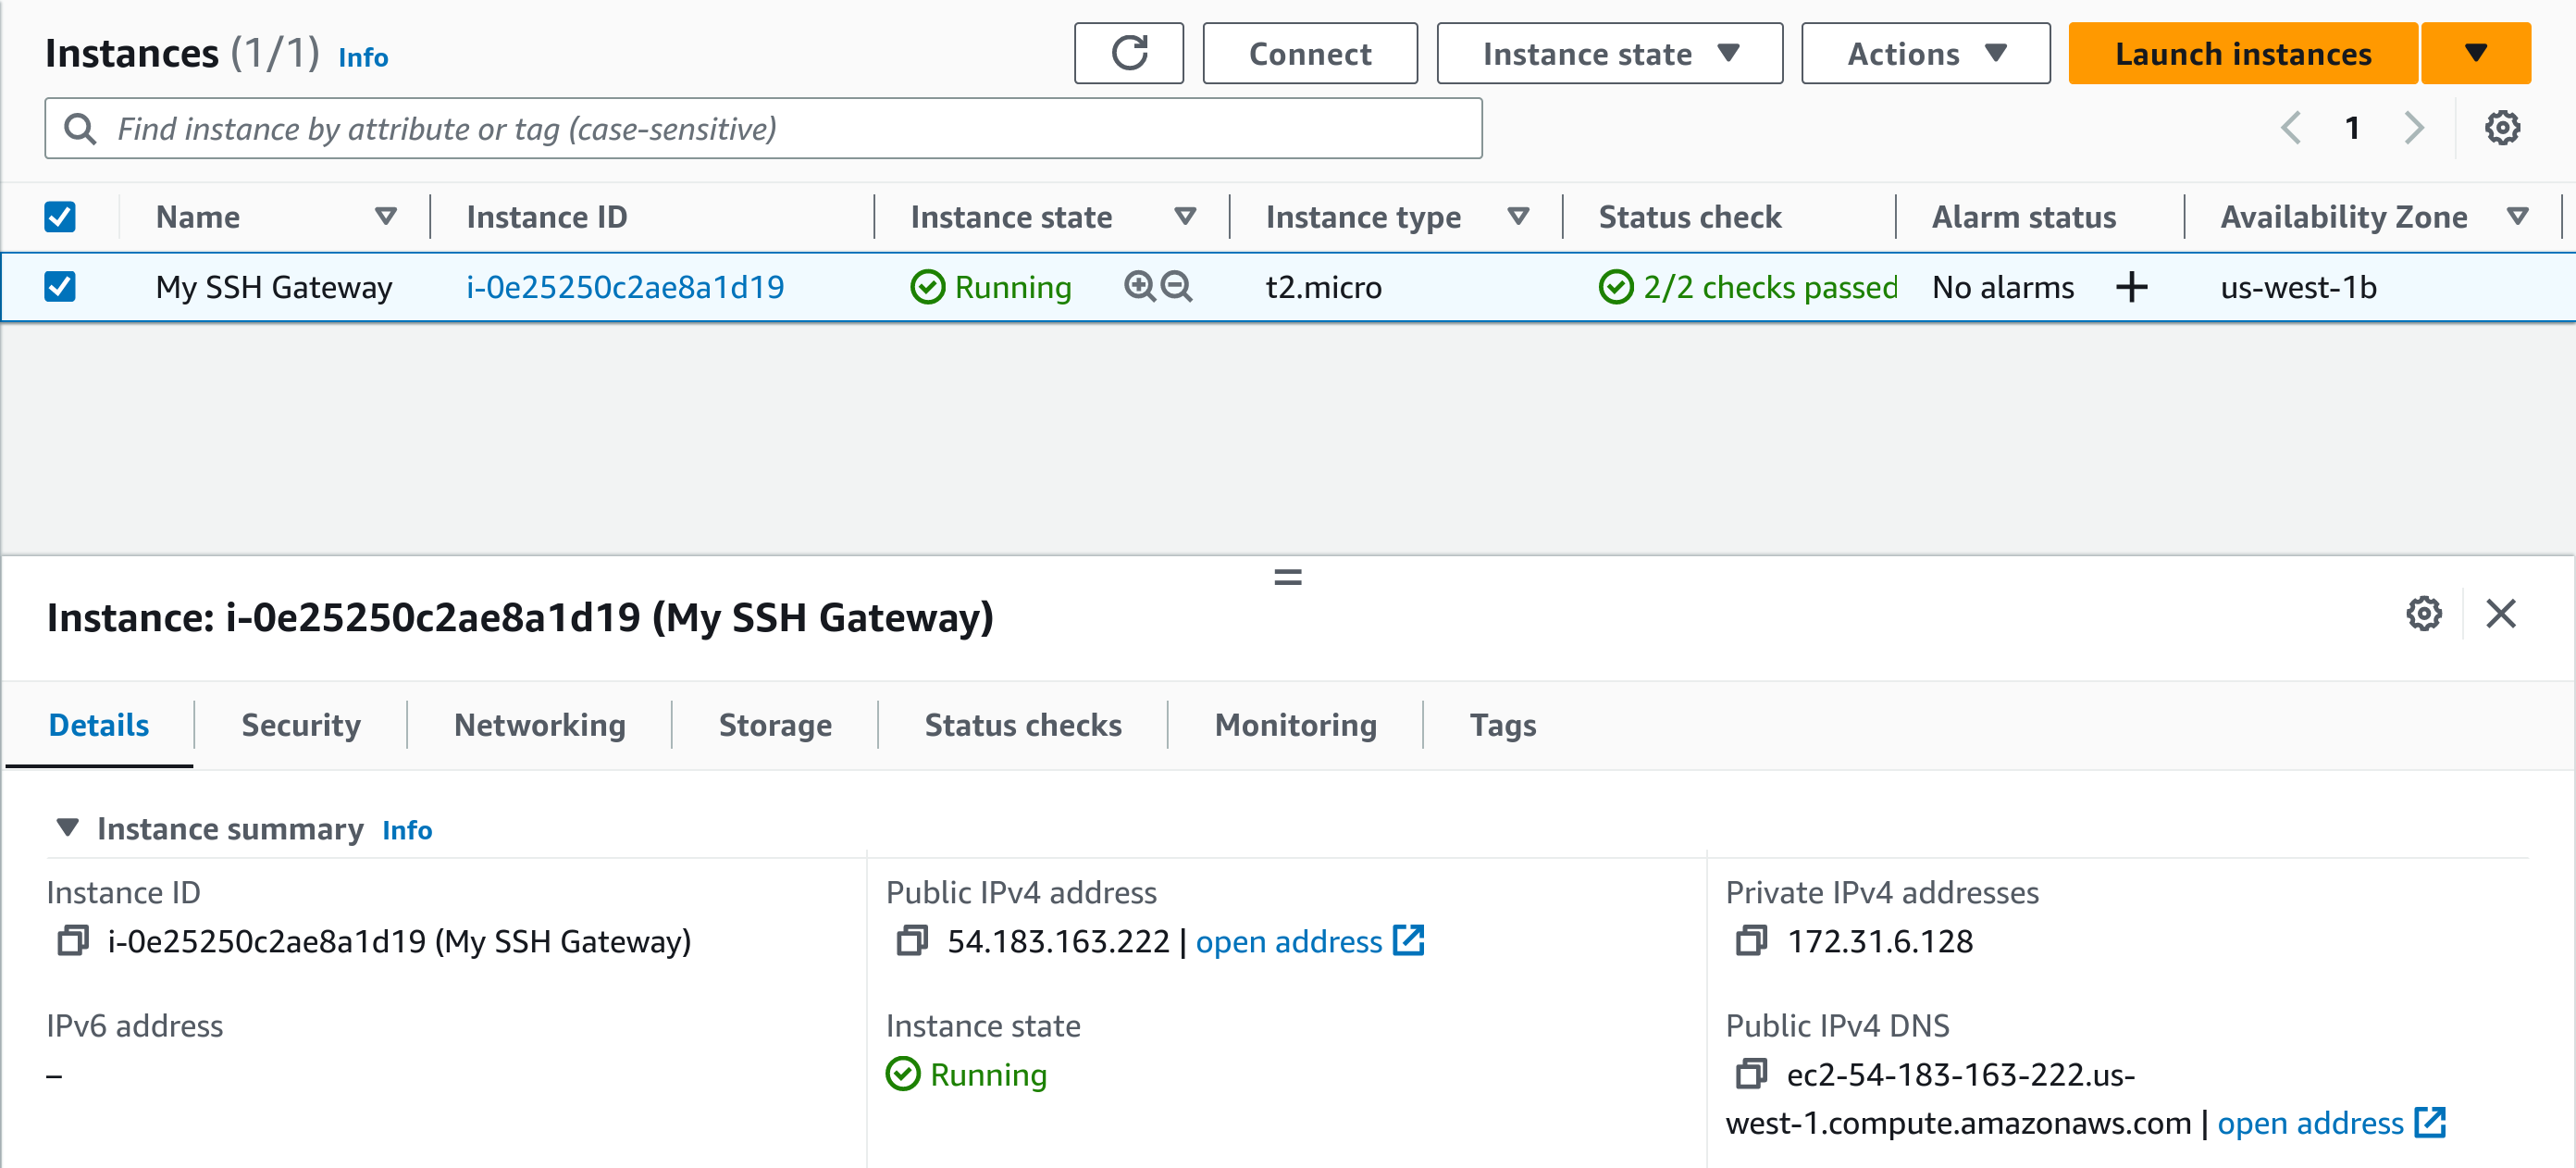
Now that we have the public IP address of my-ssh-gateway, in my case, it got assigned 54.183.163.222. Let’s put it into $HOME/.ssh/config on the laptop as follows:
1
2
3
Host my-ssh-gateway
    Hostname 54.183.163.222
    User ec2-user
If the key that was uploaded to AWS and used for this EC2 instance was not one of the default SSH keys (
$HOME/.ssh/id_ed25519or$HOME/.ssh/id_rsa), we can add a line to the config file to specify the proper key to be offered tomy-ssh-gateway. For example, to use a key located at/home/smith/.ssh/id_aws_ed25519, we can write:
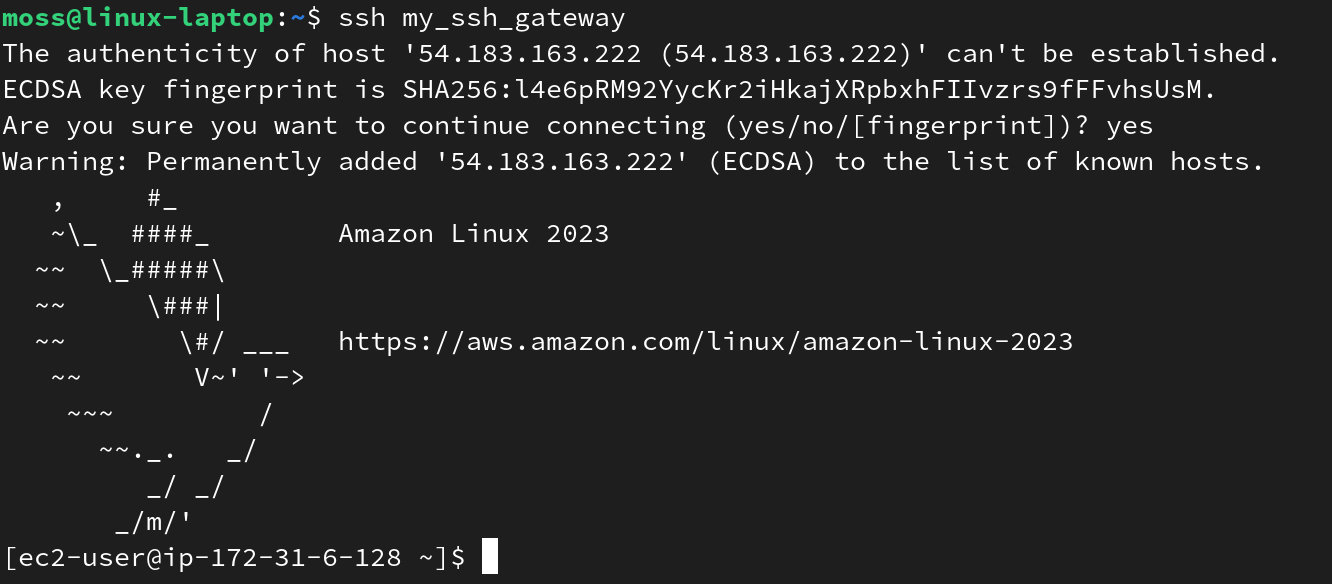
After saving the config file, we can try connecting to the EC2 instance with
1
ssh my-ssh-gateway
Since this would be the first time we SSH into this server, there will be a warning about an unknown host. Agree by typing yes. After this, we should be logged in. If the login fails or a password prompt is displayed, something is possibly wrong with the configuration. Otherwise, we can proceed to the next step.
Configure the SSH Service on the Gateway Instance
We must adjust the parameters of the SSH server (sshd.service) on my-ssh-gateway. While on the EC2 instance’s shell, use your editor of choice to edit /etc/ssh/sshd_config. For example, to open it with nano type
1
sudo nano /etc/ssh/sshd_config
Modify the following settings:
- To allow SSH clients to set remote port forwarding options, set
1
GatewayPorts yes
- Enable connection “aliveness” checks by setting:
1
2
ClientAliveInterval 24
ClientAliveCountMax 3
These options instruct the SSH server to send connection-aliveness checks (in simple words “pings”) every 24 seconds, and if three times in a row there are no replies, the SSH server closes the connection with the given client. Although the SSH server can accept many simultaneous connections, and the client can reconnect anytime, closing the old connection on the gateway server is still important.
The problem with keeping a stale connection on the gateway server is that the forwarded ports are also associated with the connection and cannot be used by other processes. If
my-ssh-gatewaykeeps the previous connection not terminated when our home server reconnects with it, SSH will fail to set up remote forwarding tunnels for the new connection. By settingClientAliveInterval 24andClientAliveCountMax 3, we ensure that the maximum duration when the tunnels cannot be re-established due to “busy” ports is 96 seconds.
After saving the modifications, we need to restart sshd.service:
1
sudo systemctl restart sshd.service
Finally, let’s add the public key of the home server to my-ssh-gateway. For that, open $HOME/.ssh/authorized_keys. Initially, this file contains the key from the laptop that was added by AWS when it created the EC2 instance. At the end of the file, simply append the contents of the public key of the home server to a new line and save the file. The contents of $HOME/.ssh/authorized_keys on my-ssh-gateway will look similar to:
1
2
ssh-ed25519 AAAAC3NzaC1lZDI1NTE5AAAAIOklFlSc2lNkJST3e2dXbLMm2J6251VOHQcfj/bTjXgj moss@linux-laptop
ssh-ed25519 AAAAC3NzaC1lZDI1NTE5AAAAINNjWtgO3qe8D6o8nErVxJdPepDx9p9cE5QH/EyDJtYR myadmin@my-home-server
This completes the configuration of my-ssh-gateway.
The SSH config on the home server
On my-home-server, add the following host configuration to its $HOME/.ssh/config:
1
2
3
4
5
6
7
8
Host my-proxy-tunnel
    Hostname a.b.c.d
    User ec2-user
    PasswordAuthentication no
    PubkeyAuthentication yes
    RemoteForward 10022 localhost:22
    ExitOnForwardFailure yes
    ServerAliveInterval 24
Replace a.b.c.d with the public IP address of your my-ssh-gateway instance.
Notice that if we try running ssh my-proxy-tunnel, the connection with the forwarding tunnel will likely be established even if we do not include the ExitOnForwardFailure option. So, let me explain why we should include it in the config file anyway.
For example, when the SSH client disconnects and the managing service re-runs the ssh command, the new connection may fail to create port forwarding tunnels if the ports are still busy on the SSH server machine (as explained above, this can happen if the client reconnects before the SSH server noticed that the previous connection is “not alive” anymore and have not yet terminated it on the server side). When this happens, by default, SSH prints the error message to the terminal but does not exit, which complicates tracking of failed tunnels by the managing service. With ExitOnForwardFailure yes option specified, the task of the managing service is much simpler.
Before proceeding to the next step, we must ensure this configuration works as expected. We can do this in two steps.
First, establish the SSH port forwarding tunnel between my-home-server and my-ssh-gateway by running the following command on my-home-server:
1
ssh my-proxy-tunnel
Second, from your laptop, SSH into your home server using the tunnel:
1
ssh -o "ProxyCommand ssh -W %h:%p my-ssh-gateway" -p 10022 myadmin@localhost
, where
- option
-o "ProxyCommand ssh -W %h:%p my-ssh-gateway"tells SSH to usemy-ssh-gatewayas the proxy server, - option
-p 10022tells it to use port 10022, connections to which, according to our SSH config, are forwarded to port 22 onmy-home-server.
Further in this tutorial, we will put these options into the SSH config file on the laptop.
Set Up a Background Service on the Home Server
The SSH connection between the home server and my-ssh-gateway can be handled by a background service that would persistently re-establish it when sudden disconnections happen. For this, we will use a systemd service. But first, make sure the tunnel we established from my-home-server in the previous session is closed by exiting from ssh my-proxy-tunnel.
On my-home-server, let’s create the service’s unit file:
1
sudo nano /etc/systemd/system/persistent-proxy-tunnel.service
And put the following in it:
1
2
3
4
5
6
7
8
9
10
11
12
13
14
15
16
[Unit]
Description=Persistent SSH proxy tunnel.
After=network.target
StartLimitIntervalSec=0
StartLimitBurst=3

[Service]
ExecStart=ssh -NT my-proxy-tunnel
Type=simple
User=myadmin

Restart=always
RestartSec=24

[Install]
WantedBy=default.target
Save and exit from the text editor.
Then, execute:
1
sudo systemctl daemon-reload
This would create a new service named persistent-proxy-tunnel.service. We can enable and start the service with
1
sudo systemctl enable --now persistent-proxy-tunnel.service
, and check its status with
1
sudo systemctl status persistent-proxy-tunnel.service
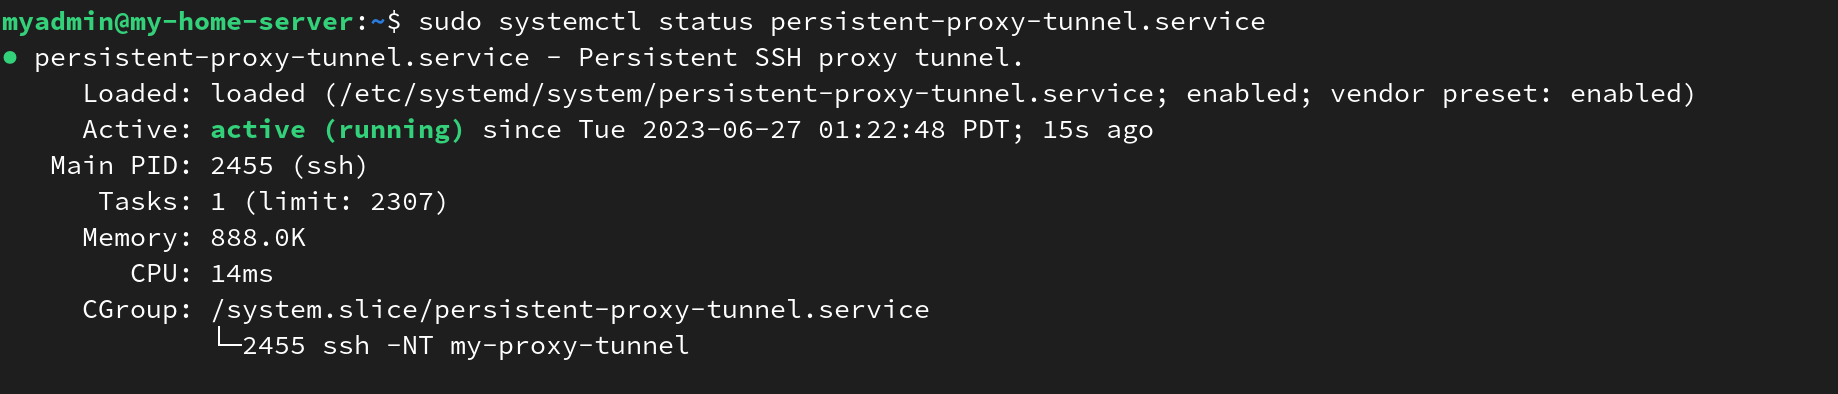 Output of
 systemctl status persistent-proxy-tunnel.service.
Add the host configuration on the laptop
Earlier, we tested the connection over the SSH tunnel by running the SSH command in the terminal. However, it would be more convenient to use a shorter command such as ssh home-server-via-proxy. To do that, on the laptop, we simply add another host configuration entry into $HOME/.ssh/config.
1
2
3
4
5
6
7
8
9
10
Host my-ssh-gateway
    Hostname 54.183.163.222
    User ec2-user

Host home-server-via-proxy
    ProxyCommand ssh -W %h:%p my-ssh-gateway
    Hostname 127.0.0.1
    Port 10022
    User myadmin
    LocalForward 8080 192.168.0.20:80
That’s it. We can type ssh home-server-via-proxy on this laptop to connect to the home server when we leave the home network.

Also, the last line in the configuration LocalForward 8080 ... was added just as a bonus, or an extension of the SSH port forwarding tutorial, if you will. You can remove it. It shows how we can utilize our private services remotely. Notice that instead of localhost we can put an IP address of any host accessible from my-home-server. In this case, 192.168.0.20 could be the address of another PC on our home network or a container running on my-home-server itself (and serving a private HTTP service on its port 80). With this config, we can run ssh home-server-via-proxy, then in the web browser navigate to “http://localhost:8080” to fetch a private website hosted on the home network.
3 Additional Considerations
Finally, I want to briefly touch on a few things that can be improved in this setup.
If this approach is used to establish site-to-site sessions where the SSH client’s internet connection has a static public IP address, the EC2 instance’s security group can be edited to allow incoming connections only from this specific address.
On AWS, an auto-assigned public IP address gets released when an EC2 instance is stopped. If we decide to stop it temporarily, then start the EC2 instance again, it will get assigned a new IP address, and we will have to modify our SSH configuration. To ensure the address stays the same, on the AWS EC2 console, section “Elastic IPs,” we can allocate a new elastic IP address and associate it with the EC2 instance.
4 Conclusion
In this tutorial, we launched an AWS EC2 instance, configured it as an SSH proxy for our home server, set up a systemd service for managing a persistent SSH tunnel, and tested it on a (Linux or macOS) laptop.
Appendix A: SSH Port Forwarding Basics
This section gives a basic explanation of SSH port forwarding relevant to this tutorial.
When an SSH connection is established, the SSH client and server can securely forward network traffic for services available on either side of the SSH connection using an encrypted channel. This is referred to as SSH tunneling.
SSH supports three types of port forwarding configurations: local forwarding (option -L), remote forwarding (-R), and dynamic forwarding (-D). To make it easy to memorize, here terms “local” and “remote” reference the ports from the point of view of the SSH client machine, the one that establishes the connection and sets these options. For this tutorial, we only need to understand how -L and -R forwarding work and the difference between the two.
Local port forwarding
By specifying -L [local_ip:]local_port:remote_ip:remote_port, we tell the SSH client to tunnel through the encrypted SSH connection all TCP connections to local_port (in most cases, the local_ip part can be omitted) on the SSH client machine to the address specified by remote_ip:remote_port on the SSH server’s network.
For example,
1
ssh -L 8081:localhost:8082 username@my_remote_server
would establish an SSH connection and forward TCP data from port 8081 on the client machine to port 8082 on the remote server machine. At first, this might look confusing because the option has ...:localhost:8082. However, remember that this part indicates the IP address and the port on the SSH server machine, so it’s the remote server’s localhost address.
Remote port forwarding
Similarly, typing -R [remote_ip:]remote_port:local_ip:local_port would specify remote port forwarding. This would request the remote server to listen for TCP connections on its port remote_port and tunnel them to local_ip:local_port on the SSH client computer.
For example, the command
1
ssh -R 9095:localhost:9096 username@my_remote_server
would establish an SSH connection and set up forwarding of TCP packets from the SSH server’s port 9095 to the SSH client’s port 9096.
The SSH config file
On Linux and macOS, instead of specifying SSH connection options in the command line, we can do it in the SSH config file located at $HOME/.ssh/config. This is especially convenient when we want to set several SSH options without cluttering the command line or a shell script. For example, we can create a config file with the following contents:
1
2
3
4
5
6
7
8
9
Host my_tunnel_one
    Hostname my_remote_server_one
    User username
    LocalForward 8081 localhost:8082

Host my_tunnel_two
    Hostname 192.168.0.200
    User smith
    RemoteForward 8083 localhost:8084
Then, in the terminal, running
1
ssh my_tunnel_one
would be equivalent to ssh -L 8081:localhost:8082 username@my_remote_server_one.
And
1
ssh my_tunnel_two
would be equivalent to ssh -R 8083:localhost:8084 smith@192.168.0.200.
Post Updates
2023-07-06: Adjusted “ping” intervals
systemd service parameter RestartSec and SSH options ServerAliveInterval and ClientAliveInterval values were changed from 30 to 24 seconds.
Explanation: After I published this post, a friend sent me a link to an article from Tailscale titled “How NAT traversal works” (link) that gives a lot of details on the inner workings of NATs. The article mentions that some stateful firewalls on routers assume the connection to be alive (keeping the NAT binding and allowing incoming packets) for thirty seconds since the last transmitted packet. Coincidentally, in the original version of this article, I picked the same duration for ServerAliveInterval and ClientAliveInterval, meaning that there is some possibility that both server and client miss the “active connection” timeout on such firewalls and the communication could get interrupted more often. I think it may be better to set these options below 30 to reduce the chances of interruptions, so I changed them to 24 seconds.